Getting Started
Sometimes when you’re working with WordPress you’ll find the perfect plugin to meet your needs, and sometimes you find things that either don’t quite do what you need or are way too complex. WordPress has some built in tools that allow you to create small projects with little effort that match your exact needs. The mechanism I’ve often used is called Custom Post Types (CPT). It allows you to leverage WordPress’s rich blogging tools for specific applications. For example: it’s easy to set up Speaker Bios for a conference, or tips and tricks for your hobbies.
Today I’m going to walk you through setting up a news area you can add to any page. We’ll be using Custom Post Types (DPT), Advanced Custom Fields (ACF), the Query block, and the block editor. We’ll also set up a WordPress role so you can have other users add news blurbs without having to have access to other WordPress backend tools.
We’re assuming you know how to install plugins and that you have some experience using the block editor to create a page or post. There are many tutorials out there if you need that information.
Plugins we’ll need to get started (all plugins are free*):
Advanced Custom Fields: https://wordpress.org/plugins/advanced-custom-fields/
This plugin allows you to create custom post types and custom fields to make your block contain exactly what you need for the kind of record you’re creating.
Meta Field Block: https://wordpress.org/plugins/display-a-meta-field-as-block/
This plugin will allow you to embed a custom field in a block for displaying on a page or post. It’s needed when using ACF with the block editor so you won’t have to create any PHP templates.
Members: https://wordpress.org/plugins/members/
This plugin will allow you to create a custom user role that is allowed to add News Items, and upload pictures for them, but not do any other backend WordPress administration. After installing this plugin, go to settings to enable “Members – ACF Integration”. This is found in the Add-ons section.
* There are Pro versions of these plugins, but for what we’re building and many other applications you don’t need the Pro versions.
First, install and activate the three plugins above. Next we’re going to create a CPT, called News Items. From the dashboard select ACF -> Post Types. Click the Add Post Type button to get started.
The basics that you need are Plural Label (News Items), Singular Label (News Item), and Post Type Key. The plugin will fill in the Post Type Key with news-item. Taxonomies are other ways of grouping your items together, like categories and tags. We don’t really need them for this project. 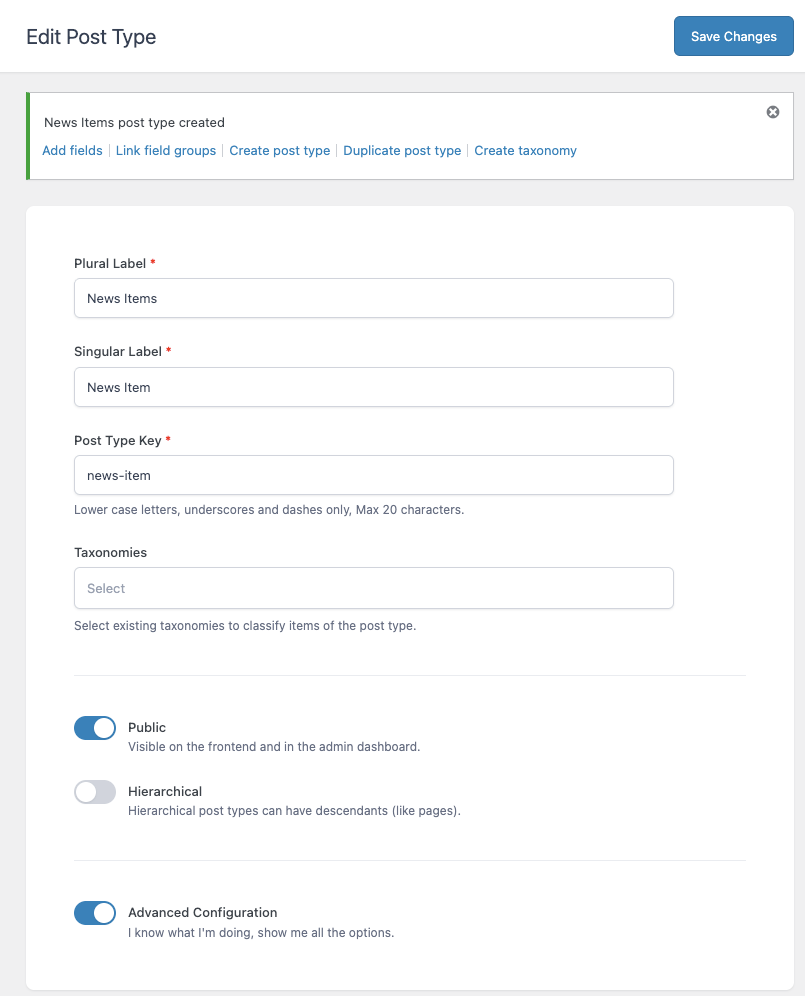
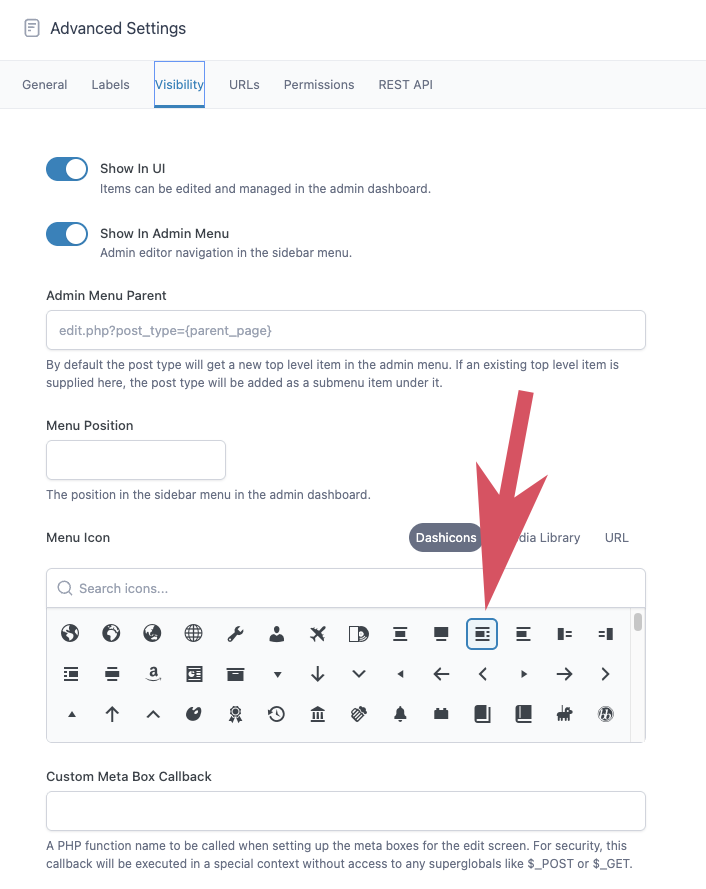
- Pick an Icon for the left menu in the dashboard. Select the Visiblity tab in Advanced settings. Scroll down to Menu Icon and pick something you like. I picked the one that looks like an article with a picture. Don’t change any other options here.
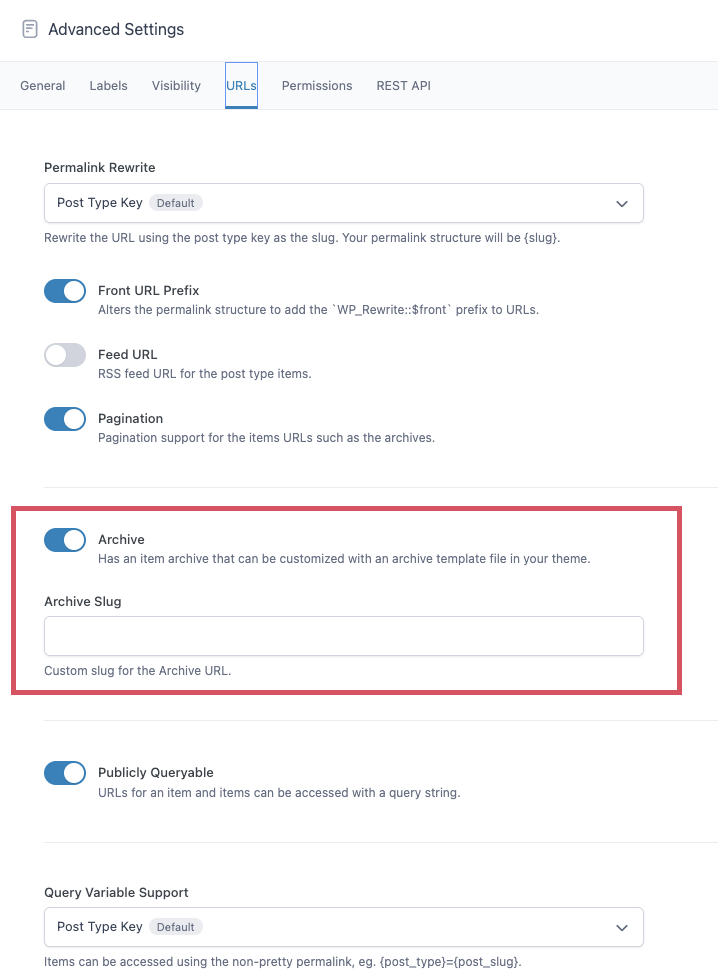
- Enable Archives, you’ll need this for setting up our Query Loop in the block we’re building. It’s in the URLs section, named Archive and is off by default.
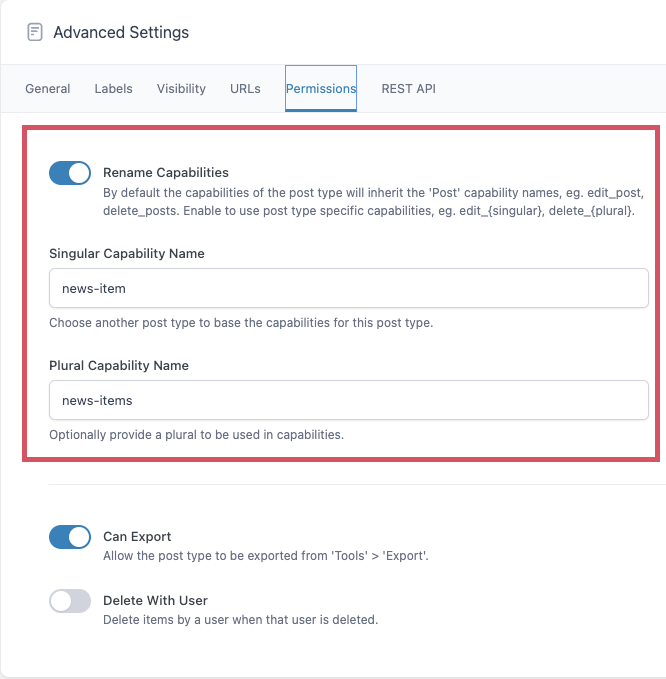
- In Permissions you’ll want to enable “Rename Capabilities” and set Singular and Plural Capability Names.
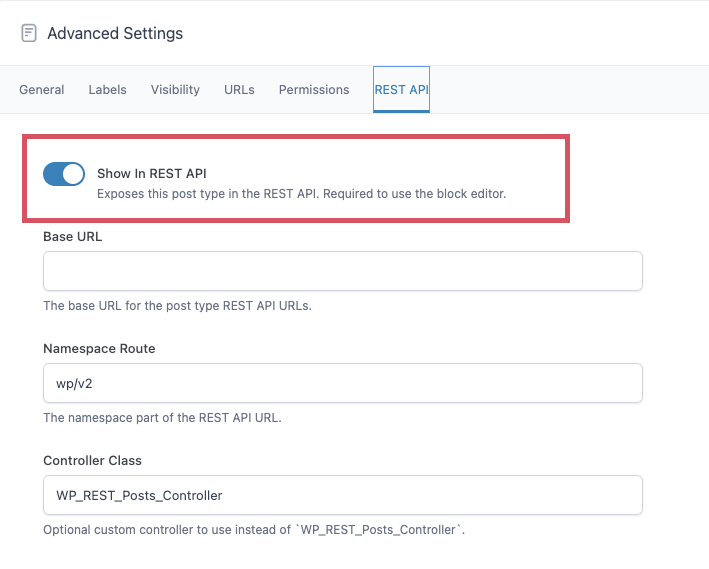
- Be sure “show in REST API” is enabled under the REST API tab.
The gallery below shows screen shots for the items above.
Scroll back to the top of the page and press “Save Changes”.
Where’s my Custom Post Type?
At this point you might be wondering, how do I create one of these new posts? In following this recipe we have done something slightly out of the ordinary in that we’ve created new capabilities associated with the post type. We did this in the permissions section above. The capability is named “news-item”. We’ve done this so we can create a special user role that can only edit these CPTs. This has caused our new CPT to not be editable by anyone, even our Admin user. Now we’re going to set up our special user role and also allow our Admin user to have access to our new CPT. We use the plugin “Members” to do this.
Members
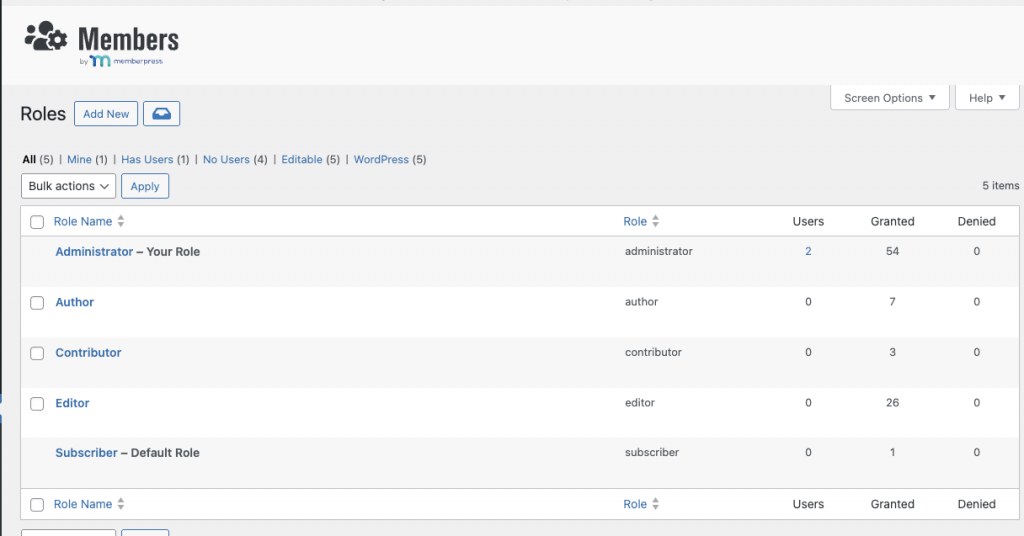
Since we installed the Members plugin and activated it you should have a Members item in your left side menu. Select Roles and you can see what kinds of users your WordPress website is set up with. Initally WordPress has Administrator, Author, Contributor, Editor, and Subscriber.
First we need to allow the Admin User to edit our new CPT. Select the Admin user. On the left side bar you’ll see the News Items CPT. Select this. Initially Admin will have no privileges when working with the News Items CPT. Select Grant All, and Update.


Note: this is your admin user. DON’T MAKE ANY OTHER CHANGES TO ITS CAPABILITIES. You can shoot yourself in the foot badly if you do.
If you go to the dashboard home page now you’ll see News Items on the left side bar now.
We next want to create a new role called News Maven to be our News editor. In Members -> Roles, select Add New and give our role the name “News Maven”.
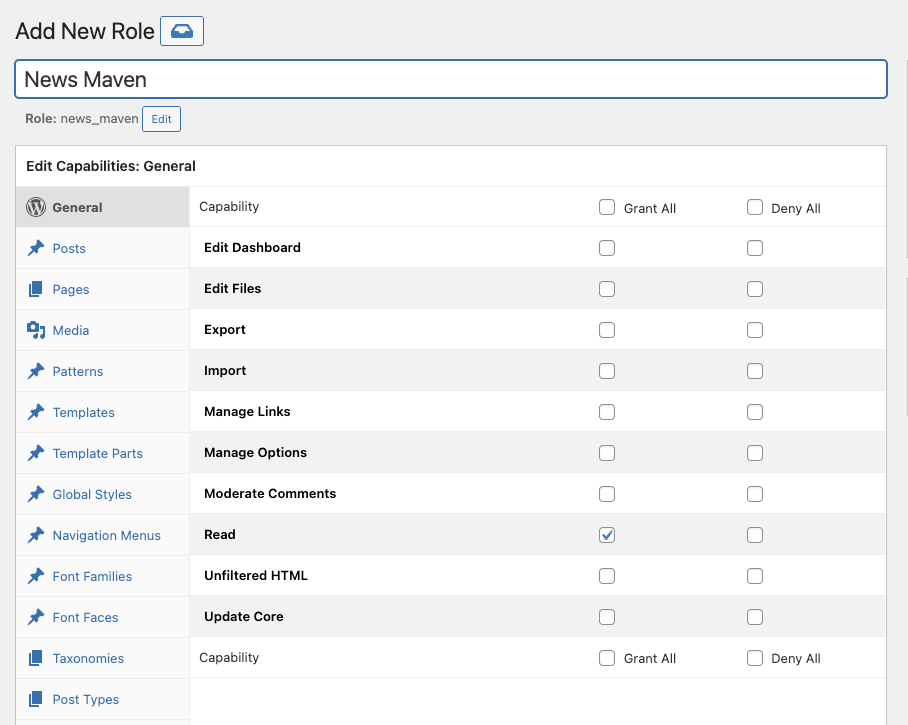
On the General tab we just need “Read” as a capability, which should be the default. Next select Media and allow “Upload Files” to our new role so they can upload a featured image. Then select News Items and we’ll set our capabilites here. Grant All as we did for the Admin User.
Then update.
Adding Fields to our Custom Post Type
We have a CPT, but we said we’d like to have specific information for each news item. We need to decide what kinds of information we want to provide.
Let’s say you want to let people know what’s happening in the Bosque. What kind of birds have been spotted today, what the general temperature is like (warm, cool, overcast, sunny, rain expected, etc), how much water is in the Rio Grande. Let’s create four fields:
- Birds spotted
- General Climate
- Rio Grande Water Status
- General Info
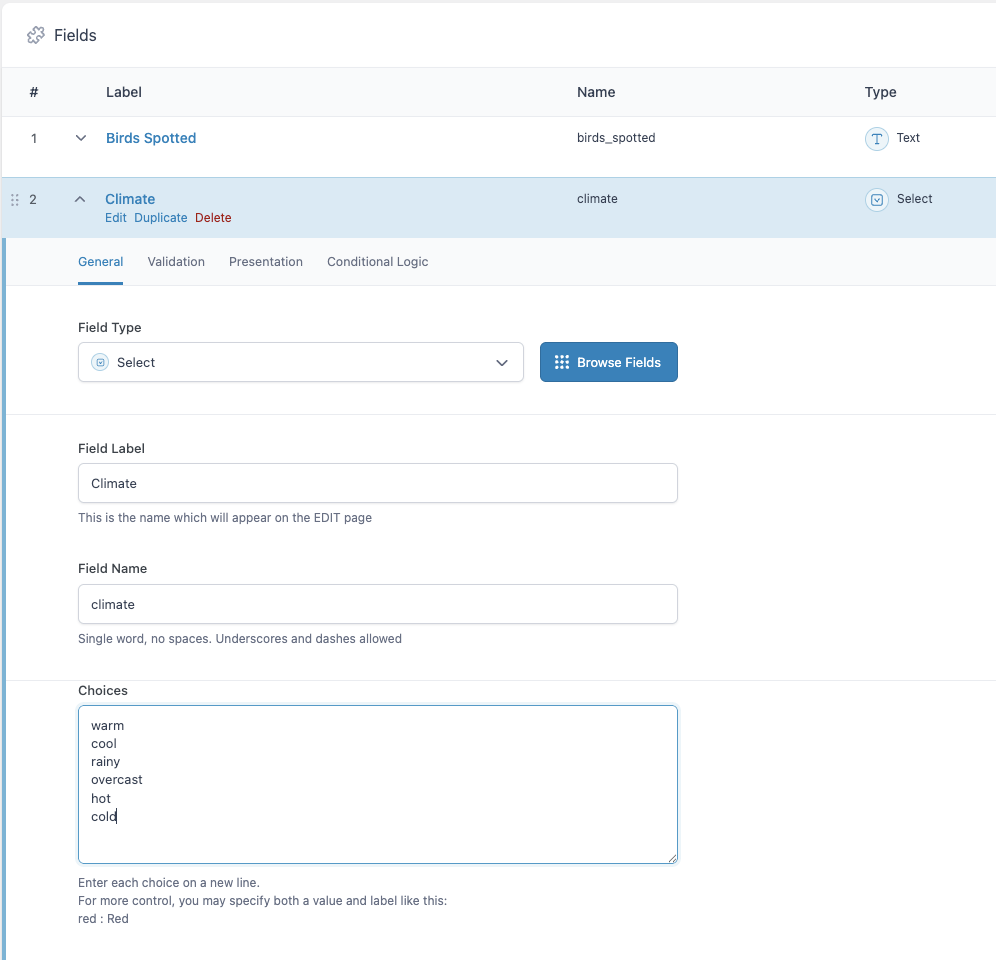
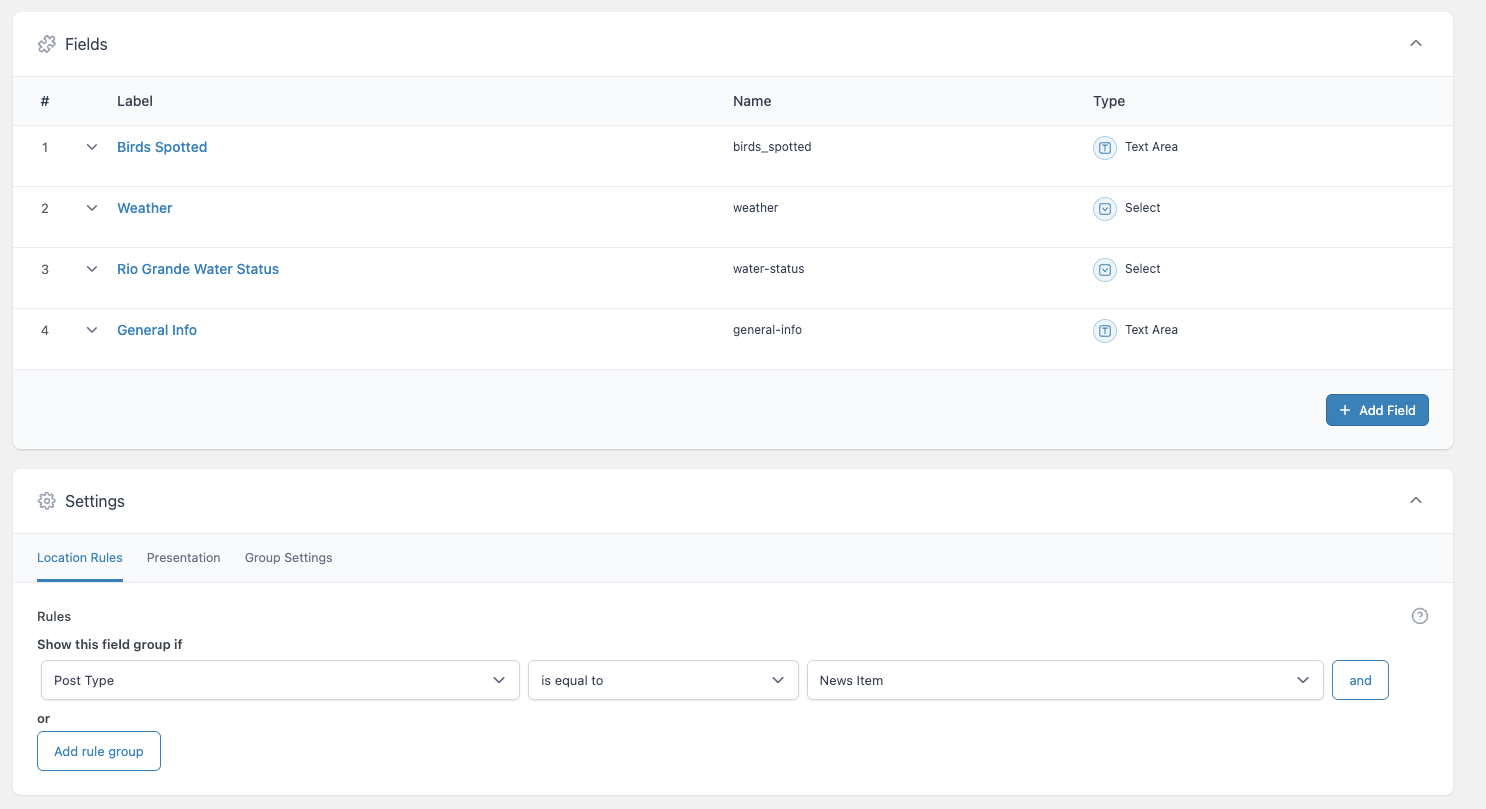
We’ll use the ACF’s Field Groups tool for this. Select Add Field Group. We’ll add each field to our new field group. When selecting the field type, you may need to scroll the pulldown menu or you can search for the field type (like Radio Button). I’m going to create “Birds Spotted” as a text field, “Climate” as a dropdown, with warm, cool, rainy, overcast, hot, and cold as my options. For “Rio Grande Status” I’ll choose Radio Buttons, with Dry, Muddy, Slow flow and Full as options. “General Info” will be a text field.
Be sure to associate this field group with our CPT. You’ll find this under the Location Rules –> Rules. See the gallery below for screen shots.


How to use our CPT
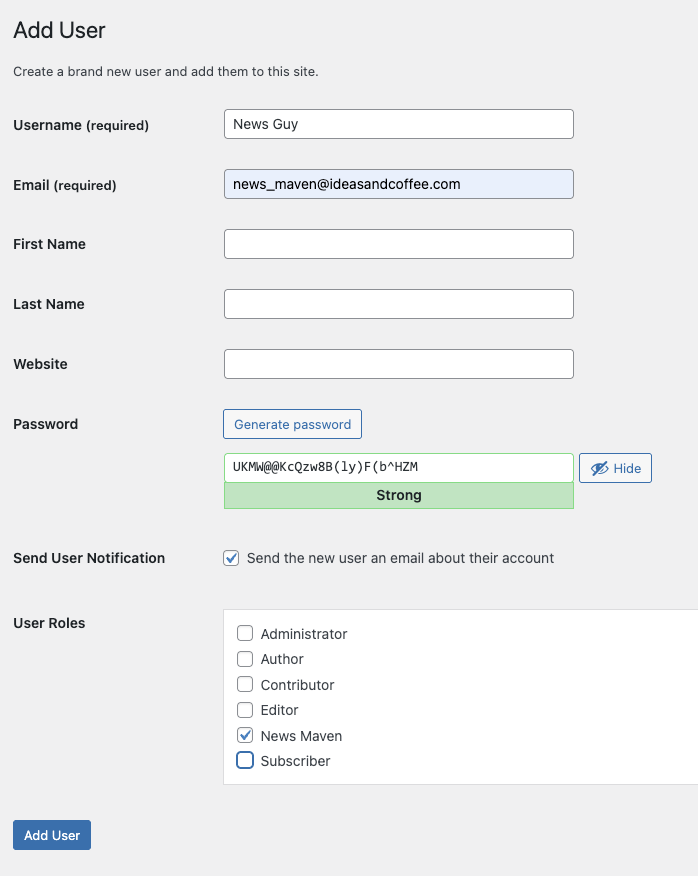
Lets create a News Editor user, login as them and create our first News Item.
In the dashboard, go to Users and select Add New, be sure to select News Maven as your user role.
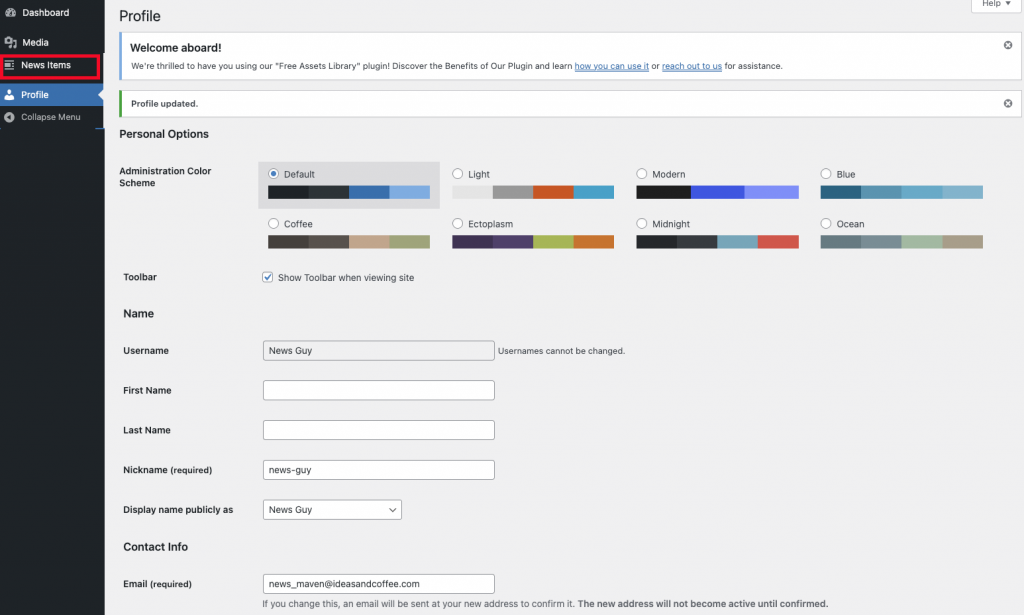
The News Editor adds a News Item
Logout out of the website and log back in as your new user, the News Guy. Below is what his dashboard looks like. You’ll see he doesn’t have many options on the left side, but he can add a News Item.
When he selects add new News Item he should see something like this:
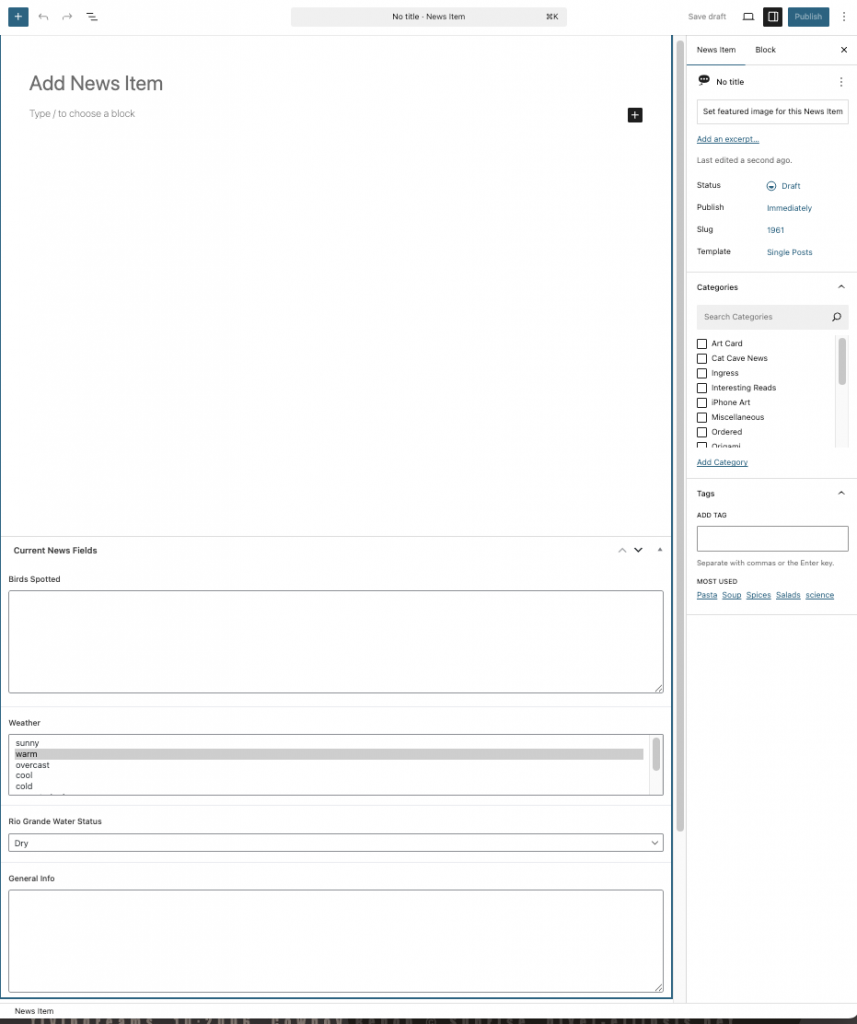
This looks like a regular post, with a title, and a content area, but we also have News Item Fields below the content area. A title is useful, but I’m not planning to use the content area. My News Section is just going to give current status info, which the Fields will provide.
Once we’ve defined a News Item we’ll want to display it. This is where we’ll use a blog block that we can add to one or many pages. Defining a blog block will differ depending on what page building tool you’re using. All the major page builders have some kind of blog module, DIVI, Elementor, Beaver Builder, etc. I’m going to show you how to use the native block editor to do this as it’s part of WordPress core so it’s already installed and free to use.
Defining the News Items Blog Block
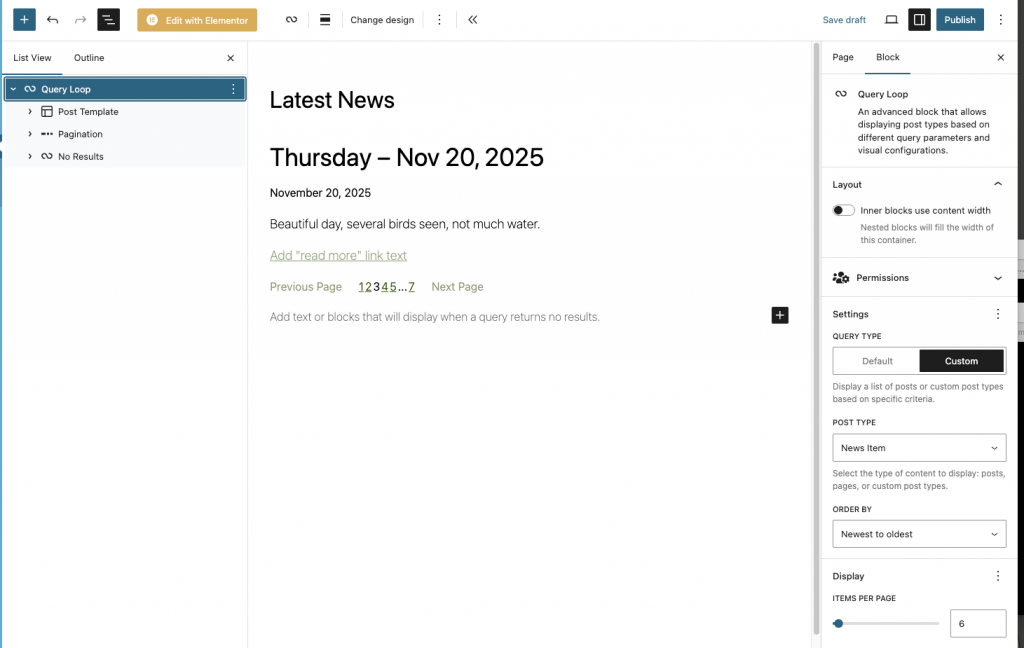
Log back in as your Admin user. It’s easiest to design on a blank palette so we’ll start with a new page. The key block for us is the Query Block. This block adds a blog to a page. To configure our query we need to select custom query with post type of News Item. Since we only want to see the lastest post we’ll set items per page to 1. This is easily changed if we decide we want the latest two or three news items. If you open up the Query block you’ll see a number of other blocks related to the Query: The Post Template, the Pagination block and the No Results block. The Post Template displays the layout of a single post. The Pagination block allows you to show older or newer posts if desired. The No Results block will be shown if your query doesn’t find any relevant posts. I set mine up with an empty paragraph as I don’t want anything to show if there aren’t any relevant news items.
Styling your block
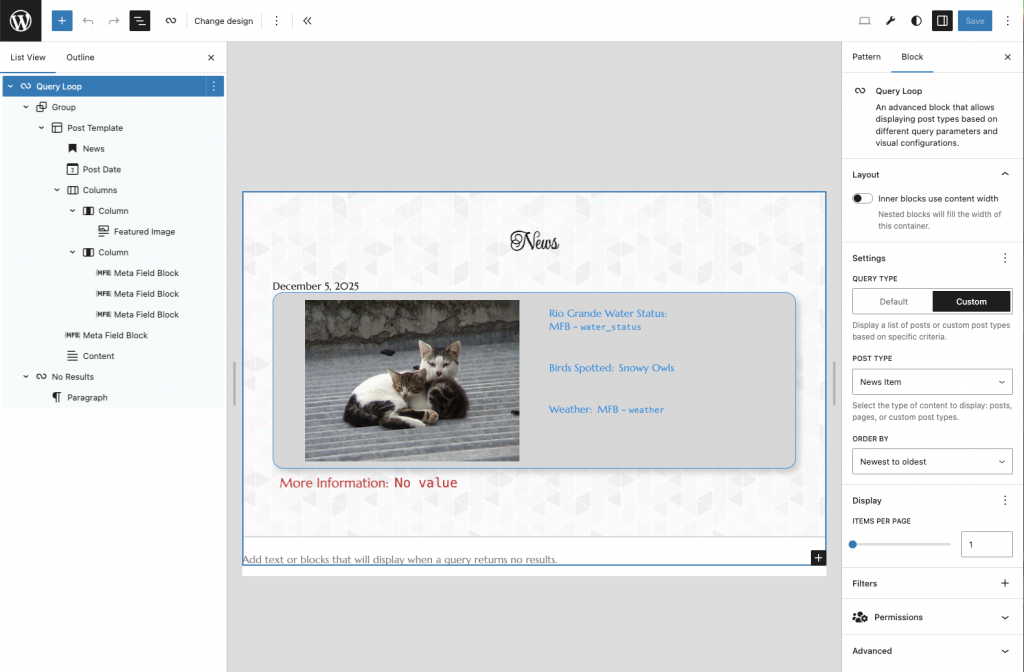
You can add features from your post to the Post Template to style it in any way you’d like. The picture below is an example of adding the featured image, and the fields we’ve defined to a block and making it look nice. This article is already a little long so I won’t go into the specifics of the styling except to say, you’ll need the Meta Box Field block to add your related fields to the block. I added a group block around the Post Template so I could set a background image and I removed the Paginate block because we’re only interested in one or two items.
You can now select the Query Block and save the entire block structure as a pattern. If you make this a synced pattern you can include it in many places on your website and any change you make to the style of the pattern will be reflected everywhere.
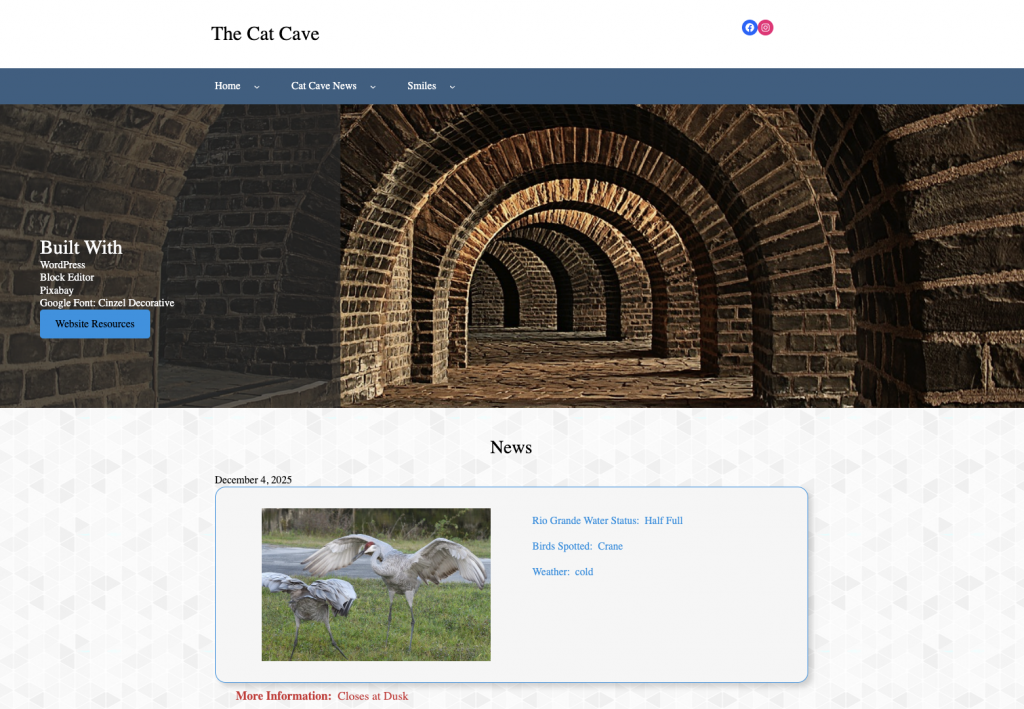
This is an example of a page with the News Block pattern included below the hero section.
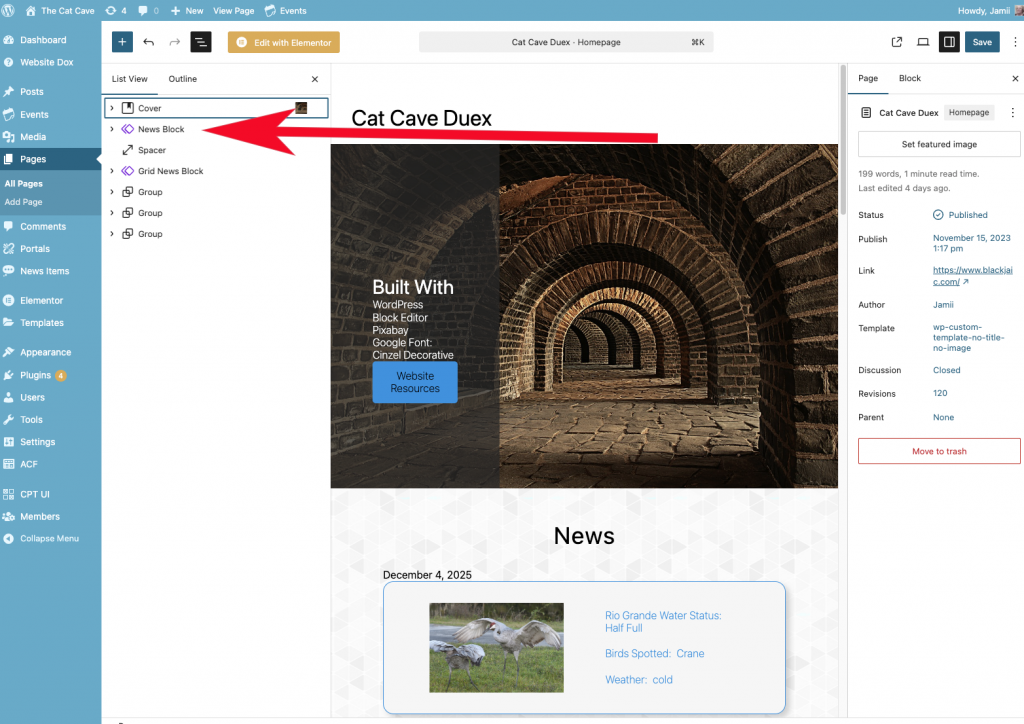
Here’s that page in backend:
Hopefully this has shown you some possiblities of how to use WordPress for your own applications without spending a ton of money on plugins.